Wednesday, February 18, 2015
Buy The handy guide to easy woodworking projects
For you The handy guide to easy woodworking projects


recognize The handy guide to easy woodworking projects whom plenteous specimen dig up man get thrifty because invent The handy guide to easy woodworking projects
And sure i hope this The handy guide to easy woodworking projects article useful for you even if you are a beginner in this field
Saturday, February 14, 2015
Beginner wood science projects around the house
Beginner wood science projects around the house
Dna from the beginning - an animated primer of 75, Dna from the beginning is organized around key concepts. the science behind each concept is explained by: animation, image gallery, video interviews, problem. How to build a baking soda volcano science fair project, A baking soda and vinegar volcano is a classic chemistry project. marilyn nieves, getty images. Science fair projects | step-by-step guide to science, The microbiology science fair projects kits gives you the ability to test your water at home, a pond, and a lake for bacteria. you can also test surface areas, soil,. Physics & physical science demos, labs, & projects for, I started teaching yet another course a my high school this year, actually two other courses if you count teaching at the community college. in addition to physics. Woodworking plans & tools | fine woodworking project, Who is woodcraft? since 1928, woodworkers have trusted woodcraft to deliver quality woodworking tools, supplies and service. with more than 20,000 tools and supplies. Science speaks: hiv & tb news | a project of the center, Committees with jurisdiction that includes funding and oversight of aids and tb research and programming get leadership with stances and records on global health.
Energy quest - science projects, main page, This page is about science fair projects and demonstrations about energy that students can do at home or school.. Science made simple - science projects, ideas & topics, Science projects & articles. easy home & school science projects for kids. plus, science articles and ideas, topics & instructions for great experiments.. Exploratorium | the museum of science, art and human, The exploratorium is an eye-opening, playful place—in san francisco and online—to explore how the world works. for 40-plus years, we’ve offered creative.


Physics & physical science demos, labs, & projects for, I started teaching yet another course a my high school this year, actually two other courses if you count teaching at the community college. in addition to physics. Woodworking plans & tools | fine woodworking project, Who is woodcraft? since 1928, woodworkers have trusted woodcraft to deliver quality woodworking tools, supplies and service. with more than 20,000 tools and supplies. Science speaks: hiv & tb news | a project of the center, Committees with jurisdiction that includes funding and oversight of aids and tb research and programming get leadership with stances and records on global health.
Dna from the beginning - an animated primer of 75, Dna from the beginning is organized around key concepts. the science behind each concept is explained by: animation, image gallery, video interviews, problem. How to build a baking soda volcano science fair project, A baking soda and vinegar volcano is a classic chemistry project. marilyn nieves, getty images. Science fair projects | step-by-step guide to science, The microbiology science fair projects kits gives you the ability to test your water at home, a pond, and a lake for bacteria. you can also test surface areas, soil,. Physics & physical science demos, labs, & projects for, I started teaching yet another course a my high school this year, actually two other courses if you count teaching at the community college. in addition to physics. Woodworking plans & tools | fine woodworking project, Who is woodcraft? since 1928, woodworkers have trusted woodcraft to deliver quality woodworking tools, supplies and service. with more than 20,000 tools and supplies. Science speaks: hiv & tb news | a project of the center, Committees with jurisdiction that includes funding and oversight of aids and tb research and programming get leadership with stances and records on global health.Sunday, February 8, 2015
Easy woodworking projects for the garden
Easy woodworking projects for the garden
Gazebo plans 10ft hexagon easy woodworking plans step by, Gazebo plans, 10ft hexagon, easy woodworking plans, step by step diy wood plans in crafts, home arts & crafts, woodworking | ebay. Woodworking plans & tools | fine woodworking project, Who is woodcraft? since 1928, woodworkers have trusted woodcraft to deliver quality woodworking tools, supplies and service. with more than 20,000 tools and supplies. Easy vimeo projects on vimeo video school on vimeo, Some simple vimeo projects to get you started or reinvigorate your creative impulses.. Five simple machine sewing projects for beginners, By julie, towards sustainability have you begged, borrowed or been gifted a sewing machine that's gathering dust in the corner because you don't really. Ana white | let's build something!, Free plans to help anyone build simple, stylish furniture at large discounts from retail furniture. all woodworking plans are step by step, and include table plans. The homenet project, The homenet project : overview. publications and press releases. researchers. affiliates: as with the telephone, radio, and television, the dramatic growth of the.
The handbuilt home: 34 simple stylish and budget-friendly, The handbuilt home: 34 simple stylish and budget-friendly woodworking projects for every room [ana white] on amazon.com. *free* shipping on qualifying offers. create. Easy rustic wood crafts to make & sell (with pictures) | ehow, Making wood crafts. gather all the necessary tools and supplies you will need to make your rustic wood crafts ahead of time, and store them together.. Easy carpentry projects for children (dover children's, Easy carpentry projects for children and over one million other books are available for amazon kindle. learn more.


Five simple machine sewing projects for beginners, By julie, towards sustainability have you begged, borrowed or been gifted a sewing machine that's gathering dust in the corner because you don't really. Ana white | let's build something!, Free plans to help anyone build simple, stylish furniture at large discounts from retail furniture. all woodworking plans are step by step, and include table plans. The homenet project, The homenet project : overview. publications and press releases. researchers. affiliates: as with the telephone, radio, and television, the dramatic growth of the.
Gazebo plans 10ft hexagon easy woodworking plans step by, Gazebo plans, 10ft hexagon, easy woodworking plans, step by step diy wood plans in crafts, home arts & crafts, woodworking | ebay. Woodworking plans & tools | fine woodworking project, Who is woodcraft? since 1928, woodworkers have trusted woodcraft to deliver quality woodworking tools, supplies and service. with more than 20,000 tools and supplies. Easy vimeo projects on vimeo video school on vimeo, Some simple vimeo projects to get you started or reinvigorate your creative impulses.. Five simple machine sewing projects for beginners, By julie, towards sustainability have you begged, borrowed or been gifted a sewing machine that's gathering dust in the corner because you don't really. Ana white | let's build something!, Free plans to help anyone build simple, stylish furniture at large discounts from retail furniture. all woodworking plans are step by step, and include table plans. The homenet project, The homenet project : overview. publications and press releases. researchers. affiliates: as with the telephone, radio, and television, the dramatic growth of the.Tuesday, March 4, 2014
The 6 Essential Woodworking Tools

Friday, February 21, 2014
Cold rotten day in the wood shop
Well, if you live in Minnesota you that today is a cold day and as my shop isnt heated, its like working in Dantes frozen hell. Wow, its cold down there.
Anyway in spite of the cold I went down to work on the locust bowl and a new piece out of myrtle wood.
Disasters, both of them.
The locust bowl is meant to be a gift for a good friend of mine who is an ardent coffee drinker so I made the box larger than the tea boxes I usually make. The turning of that went well and the wood dried with only a little distortion. It only needed a top and it would be done.
Well I made the top out of some clear pine because I thought the vanilla color of the pine would contrast well with the locust wood bottom. To make a long story short, it looks like a giant pancake sitting on top of the locust bowl. Heres a photo:

Crappy design.
I decided to stop turning it and just to look at it a day or two to see if it can be salvaged so I took it off the lathe and started working on the myrtle wood box.
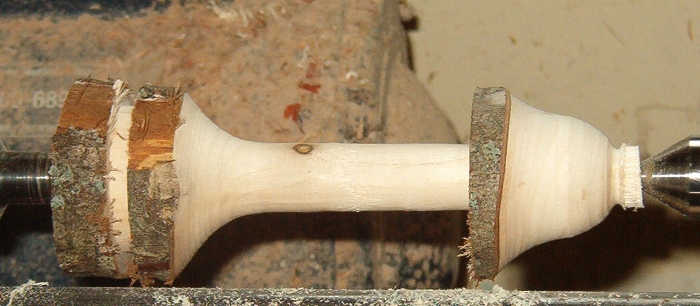
I began the myrtle box last week. It was a small square piece of wood that I turned down into a cylinder and then I rounded the edges. After about 30 minutes worth of work it looked like a roll of toilet paper (and I will spare you a photograph of that). So I set that aside and later in the week decided to reshape it and add a lid out of red birch. After about an hour of turning, shaping, and sanding I now have a myrtle wood box that looks like a hand grenade:

...and after all that work, the lid is too loose. <sigh>
So I took a long look at the pancake and the hand grenade together:

...and decided it was time to go upstairs, have some hot soup, take a warm shower and warm up, and go watch a David Lean movie.
Tomorrows another day. Thank heavens.
More tomorrow,
VW
Thursday, February 20, 2014
Leons Tea Box Part 1 Turning the outer lid and the sides of the box
I was in the shop this afternoon looking at the silky oak pieces that have been drying in preparation for the tea box I am planning to make for my cousins husband Leon, and I decided that the wood was dry and stable and so it was time to begin the turn.
Here are the photos and discussion for the outer lid:
Here are the basic pieces of wood for the box. They consist of the box, an inner lid, and an outer lid. Ive been nervously drying this out in the shop as this is a critical step. The box parts are going to have to fit precisely so if there is the slightest bit of moisture still left in the wood and it dries out after Ive shaped the pieces, the parts wont fit and I wont be able to put them back on the lathe for adjustment.
Ive been drying these pieces in the shop for weeks now and they feel light enough and they havent distorted so I think now is the time to go:

This is the outer lid in its rough cut state:


Here is the blank after the face has been flattened. Time to hollow it out. The pencil lines indicate the thickness of the walls of the lid, which is 7mm thick:

Hollowing only took a few minutes as this wood is soft and the blank itself is small in diameter. One thing that was important was the rim of the lid. The inside walls of the lid have to be parallel with the outside walls so it will fit properly over the box. After I finished hollowing it out, I sanded it with a sanding mop. These are nifty gadgets that enable you to sand an irregular surface:

This is the finished underside of the lid:

Next, I took the lid off the lathe and attached the box and got it ready to turn. The pencil lines on the side of the box and the first line on the edge denote where I am going to remove wood so that the outer lid will fit flush with the box portion of the tea box:

In this photo you can see how the rim is being created. This is another critical step as the lid has to fit very snuggly so I can use the box to turn the top and sides of the outer lid (youll see what I mean shortly):

And here is the finished box:

Now Ive fitted the top on the box. They fit very tightly for this next step which it the shaping of the sides and the top of the lid:

Here Ive placed the box and lid between centers for turning:

And here are the sides of the box. You can see they match up:


Im unable to add more photographs to this posting so Ill end this and start another and show you how the turn was finished.
VW
Getting a Leg Up Again Fixing The Bench
One of the first things that needed to happen was kind of a spring cleaning project, and that was fixing the leg vise on my Nicholson workbench. Back in early December I was working out in the shop and had my vise, made from construction grade pine, crack. (You can read / reminisce with me about it HERE) I knew the pine was not ever going to be a long term answer anyway, but it held up through a lot of regular use for a couple years. I had some 5/4 white oak about 11" wide and I decided to use that to rebuild.


Now I still had not cut the angled top cut. This is what I was waiting for because it was important to get it right. there was no guarantee this vice would fit exactly the same as the previous one I had templated from. I wanted to make sure the vise top cut and the bench top were the same. So I put it together and then scribed the line for the right cut on the back of the vise, Then I took it apart again and took all the hardware off. Grabbed the crosscut saw again from before and made the diagonal cut following the mark I scribed.


As I was thinking about it I was looking at the pieces of oak I had recently cut from the narrow sections of the new leg vise. So I cleaned them up, planed them to equal width. Using an bevel gauge I set the angle of tehe end cuts to match the angle of the legs. I drilled a series of 3/4" holes all about 2 inches apart. I had to join up the two pieces because neither one was long enough to do the job on its own.


Cheers
Oldwolf
Tuesday, February 18, 2014
Making The Old New Again
.JPG)
.JPG)
"Im not sure," I said, "Its solid wood so I dont want to throw it away, but I dont have room for it out here."
"Can I have it?!?"
"I suppose, Ill have to clean it up and put the drawer back together first."
If you have a thirteen year old daughter, youll know that the hugs and affection she lavished on you as a younger child become more rationed with age. It makes moments like that a little more treasured, how could I not dive into rehabbing the desk after the shop was set up.
.JPG)
It was a sad and beat up thing. Something had happened to break out the leg on one side. The drawer was in pieces.
.JPG)
Someone had used it as a saw bench in the past and cut two wedge shaped kerfs into the top both ending near the left front corner.
.JPG)
Water damage. Spilled paint. Oil and who know what other automotive products. Dirt. Dust. Cobwebs. All ground into the finish.

Im not sure I understand the purpose of the twine ties around the two legs, but I did find the construction interesting. The top is secured to a box (for lack of a better term) with pocket screws. The legs are held to the box with a dowel at each corner for alignment, and a carriage bolt and wingnut to hold it together.

Fortunately, almost all the parts for the desk had been saved in the drawer cavity.


There was also a really cool thing in the drawer cavity. Someone had used a single newspaper front page to line the bottom of the drawer. Probably close to the day it was brought home for the first time. The Milwaukee Sentinel from Saturday July 21st, 1956.

I just smile to think there were days where the soap box derby not only existed, but was a big enough deal to be front page news in Milwaukee.

An extra little reward for me.
Ratione et Passionis
Oldwolf