Wednesday, March 5, 2014

Stickley Architect


My last posting alluded to Stickley’s architectural philosophy. Why I am talking about architecture in a furniture class? Primarily because it is a part of the Arts and Crafts movement that is so identified with Stickley. But another reason is that I started out wanting to become an architect and I just can’t resist the chance to talk about it.

Stickley believed that a house should be constructed in harmony with its landscape using local materials; should have an open floor plan; exposed structural elements; and, take advantage of natural light by keeping artificial light to a minimum. His philosophy had an enormous influence on Frank Lloyd Wright’s designs.

In the early 20th Century it was not uncommon to purchase a kit home via mail order from companies such as Sears Roebuck, Montgomery Ward, and Aladdin. You could buy anything from a Queen Anne to a Craftsman Bungalow to a large farmhouse. Sears continued to sell kit homes up to the start of World War II. In total, Sears sold between 70,000 and 75,000 kit homes via mail order. Craftsman homes were very popular.

Sears “Modern Homes” catalog consisted of over 370 designs. The kits were shipped via boxcar and consisted of 10,000 to 30,000 pieces and came complete with a 75-page instruction book. Each piece was marked with a number to help facilitate assembly. And you thought making a mortise and tenon joint was hard. Here is a website that will help you identify if you have a kit home - http://www.wikihow.com/Identify-Kit-Homes.

Stickley took advantage of this craze and published 221 house plans in his magazine, The Craftsman, starting in 1903 until the magazine’s demise in 1916. Like his furniture, a Stickley home had simplicity of design; quality of construction; natural finishes; and exposed structural elements for decorative design. One of the plans, Craftsman Home No. 178, Gambrel Roof (a hipped roof like you might see on a barn – one with two angles) and Wide Dormers is illustrated.
ReadMore...

Working on a sliding lid box

I finished up a sliding lid box this weekend. Its funny, because I was originally going to make this using a router for the inside. Unfortunately, my router bit wouldnt dig deep enough, so I decided to cut it out on the band saw. Then I decided to use a scroll saw, so I could avoid cutting the entry point that would require gluing.

Well, I screwed up a key part cutting the lid and ended up having to make the box much shallower. I could have done it on the router to begin with! I like the way the lid works out, though. Video on Friday.


ReadMore...

Tuesday, March 4, 2014

Shaker Simplicity


Hi all--

This is my attempt at research blog entry #1. Hopefully this is more or less how it ought to be done.....

I have to admit to not having been familiar with most of the names on the list we had to start out with, so my first step was to go online and look at whole bunch of images to help me figure out who and/or what I was drawn to. Much of the work was too fancy and frilly, or too modern looking, or too sculptural to appeal to me. I like my furniture and woodwork in general to be sturdy, functional, and simple. So naturally I gravitated toward the Shaker furniture.

The lovely bare-bones designs of Shaker style furniture were based in religious belief. I came across phrases such as "God is in the details", "beauty rests in utility", and "simplicity is the embodiment of purity and unity"-- tenants of the Shaker religion attributed to Mother Ann Lee that can be clearly seen reflected in Shaker craft. This write-up here gave a nice overview, as did this one from furniture styles.net. This piece from woodworkersinstitute.com got a bit more technical and led me to an intriguing look at oil finishes but what I really want to do now is to go get a few actual paper books to read on the subject. My interest is piqued....

I tried to upload the picture down here but Ive no idea how to use this blog site and it put them at the top and I really dont know why or how to move them. But these are from an antique dealers site, supposed to be the genuine, old article (some of the new stuff in the same general style is a bit prettier...). Note the dovetail joints, which are apparently a hallmark of Shaker construction.

Right. Thats all. Thanks for reading,
Jahnavi

ReadMore...

The 6 Essential Woodworking Tools

In woodworking, in order to complete and to get your project done easily and smoothly, you will need to have woodworking tools. Is without a doubt that woodworking tools are the most important thing in woodworking. Here are some tools for woodworking which you should know.

1. Measuring Tools and Marking Tools
Protractor, measuring tape, scratch awls, marking knives, plane gauges, hygrometers, winding sticks, straightedges, combination squares and try squares

2. Cutting Tools (Hand Saws and Power Saws)
a) Hand saws
Cross cut saw, keyhole saw, bow saw, coping saw, tenon saw, gent’s saw and dowtail saw.

b)Power saws
Chainsaw, miter saw, scroll saw, radial arm saw, band saw, hole saw, circular saw and table saw.

3. Shaping Tools
Hand planes such as shoulder plane, smoothing plane, rabbet plane, spear plane, block plane and scrub plane. Other shaping tools include adze, rasp, froe, spokeshave, drawknife and jointer plane.

4. Assembly Tools
Screwdriver, hammer, mallet, hand drills, power drills and clamps

5. Finishing Tools
Sandpaper (can be used with power sanders), file, scraper, brushes and spray guns for applying lacquer

6. Furniture and Accessory Tools
Workbench, vise, bench hook and sawhorse

The above tools for woodworking are important for your wood projects. It is not necessary that you have all of them. By having some of these woodworking tools shall help you a lot in your project.

Recommended Instant Access To 14,000 Woodworking Plans & Projects

ReadMore...

Dinner Tray

Another quick and small but satisfying project ... 
 A simple Pine Dinner Tray which I have made for my girlfriends mum as a thankyou for the tools she gave me a while ago.

I am starting to feel a lot more comfortable simply knocking together these small projects on request. 

The simple joinery for the side pieces was cut mostly by eye with very minimal measuring and mark up. I need to be careful that I dont get too lazy!
Another first for me was the Edge to Edge joint I used to make the base board from two pieces of 15mm thick by 145mm wide Pine.

The longest and most tiring part of this project was reducing the thickness of the base board to minimise the overall weight of the tray, while retaining flatness.

Lastly, a quick coat of Boiled Linseed oil to highlight the grain a little and I called it done.

I hope she likes it ...


ReadMore...

Monday, March 3, 2014

Dust collectors

I made my first attempt at hand cutting a dovetail joint this weekend. It were pretty much the most pathetic looking dovetail you will ever see. Even worse, I shot a real-time video of my attempt. Shawn over at Worth the Effort Woodworking is having some guys make dovetails and then practice for a week and see how/if we improve. I think I should do better next weekend. Ill post his video when he gets it done.


It seemed like a good idea at the time.


I have a dovetail jig that works perfectly and, well, I hardly ever use it. Its something I bought a long time ago thinking that I would be making dovetail joints all the time. Mainly, its complicated and I always forget how to use it. As a result, it sits around and collects dust. So Im looking forward to learning how to hand cut dovetails. Maybe Ill be more likely to use them.

Weve all acquired tools that seemed useful at the time, but end up getting very little use. I would almost include my biscuit jointer in this category, except that I have gotten a fair amount of use out of it and I still use it for edge joining panels. But for the most part it collects dust.A lot of us jumped on the biscuit bandwagon years ago when Norm Abram seemed to use it for every project. I think pocket hole jointery has replaced it for the most part.

Do you have any tools that make you wonder why you ever bought them?

*****

Mere Minutes

ReadMore...

A Beginners Guide To Easy Wood Projects

By [http://ezinearticles.com/?expert=T_L_Kuhn]T L Kuhn
Much of life was different when your great-grandparents were young. The art of woodworking was seen as a masculine craft and something a father might teach to his son. Some even made a good living from the easy wood projects that they sold to others. Back then, if you had some spare time, it was likely spent by creating some woodworking projects of some kind.
Its certainly not the same in todays world. Very few people have the knowledge or the time to do their own easy wood projects, and end up purchasing the items that, years ago, were built by hand. Imagine all the money you could save by being able to make your own chairs, tables and beds. But, you just dont know where or how to start.
Learning how to create some easy wood projects can be fun.
The internet makes it so much easier to learn about anything today, and woodworking is no exception. Its a wonderful resource for finding out about this seemingly lost art. The key to getting good at woodworking is practice. Youll find yourself getting better with each of the easy wood projects you complete.
What will you need and just how can you get started?
To get you started with your do it yourself woodworking projects, youll need some basic tools. Again, the internet is a great place to get all of the woodworking tools that you will need. The best thing to do is make a list of what you need to get you started. Make sure you shop around so you get the best price you can on just what you need. At this point, its important that you stay within your budget. You dont need the added stress of spending too much money.
Just what tools to buy for your first set of easy wood projects is probably still a mystery at this point. You will be able to get all of the guidance you need from the many resources on the net. There are plenty of good, well thought out programs available to lead you down the right path when it comes to just about everything you need to know about creating easy wood projects yourself.
Woodworking is one of those great American pastimes that is enjoyed the year around by many people. Its a great hobby for anyone with an interest in creating something with their hands.
Once you begin producing some easy wood projects, who knows, you might be able to make some extra money by selling some of the pieces you create to some of your friends or relatives. Remember, the goal is to enjoy the process.
For much more information on the art of woodworking and for some [http://easywoodprojects.org/]easy wood projects you can do, visit my website at: http://EasyWoodProjects.org
Article Source: [http://EzineArticles.com/?A-Beginners-Guide-To-Easy-Wood-Projects&id=6663663] A Beginners Guide To Easy Wood Projects
ReadMore...

Woodworking Saws To Make Your Woodworking Easier

Power tools are equipment that you should have in your woodworking workshop. Among the most important equipment for your woodworking projects, are woodworking saws. For better value for your money, you should check table saws from Jet power tools. Here are some information about Jet table saws and also Jet Lathes.

Jet Table Saws

Jet table saw is a great tool for power and accuracy in all woodworking workshop. The precise horsepower you will get, will be based on the table saw that you get, however count on about a three or more hp(horsepower) motor. The fence falls between thirty inches and forty inches. The assembly instructions is good and that means even a beginner can set the equipment up. Just like any other saws, you will need to change the saw blade every few years.

Jet Lathes

The lathes made by Jet, are easy to use and are easy assemble. Jet lathes can be very useful for a few number of various jobs. There are also lathes which come with additional tools as an additional bonus, such as an eight-piece chisel set as well as other hand tools. As you may have already known, you can never buy too many chisels, as such these bonus tools will help you to build up your tools collection without spending more money.

Technical Details for JET 708352 JWL-1236 Woodworking Lathe, 12-Inch Swing 3/4 HP 115-Volt 1-Phase:

-12-inch variable speed wood lathe with stand
-3/4-horsepower motor; 550 to 3,000 rpm; 34-1/2-inch distance between centers
-Cast-iron lathe bed, headstock, and tailstock; heavy-gauge steel components; metal motor housing
-Includes lathe, stand, tool rest, 6 face plates, spur center, live center, face shield, tooling knockout
-60 by 17 by 44-inches; 183-pounds

Hopefully, this woodworking saws article will help you in deciding which woodworking saws you should buy. If you are looking for woodworking plans, then checkout the following 14,000 woodworking plans & projects.

Recommended Instant Access To 14,000 Woodworking Plans & Projects

ReadMore...

Happy Halloween

Hope everyone has a happy, fun and safe Halloween with friends and family!

Lots to share with you this week.  A thrift chair redo that I am crazy for, a giveaway, new french inspired bread boards and a very cool find from hubby!   Stay tuned!  Im going to go enjoy Halloween with my family!  Have a great day!

Click here for bread boards.
ReadMore...

Sunday, March 2, 2014

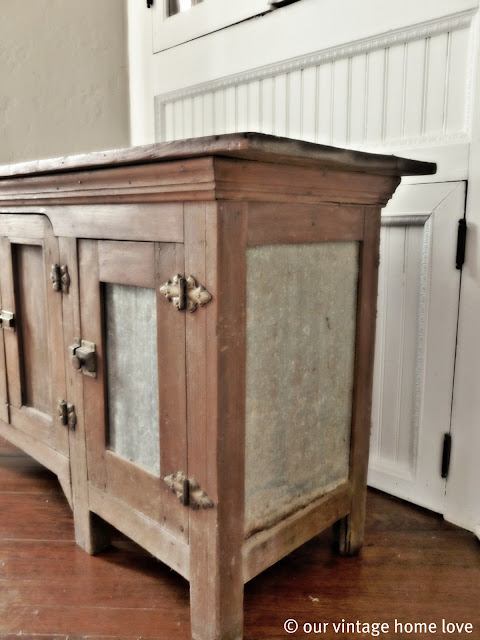
Vintage Cabinet and 50 Visa Gift Card Winner

Happy Monday everyone!  Did you have a good weekend? 
My hubby is in the process of cleaning out a few storage units he purchased so he has been bringing home fun things for me to play with.  His latest find is this cabinet that Ive not figured out what to do with yet.  Here it is in its original state.
I think it is beautiful but Im not really sure what it is.  Does anyone know?  The end reminds me of a little pie safe with its tin sides and shelving.
 
The hardware is beautiful but Im not sure I want to keep the hinges.  However, I love the door handles so they are staying.
The top has a hole in it and will have to be replaced.  And I havent decided if I want to paint it or just improve its original features.  
 Im also not sure if I even like the tin sides.  I love the aged tin sides on this piece from Anthropologie.
via
 I wonder if there is some sort of treatment I could apply to the tin to replicate that look.  
Anyone know?  Lots of decisions, huh!  What do you think?


P.S.  The random number generator has selected 199 as the winner of the giveaway and that belongs to:

Gail whos comment was: 
"I found the blog site, Yeah!!! LOl. I love the end tables...I must also say, I liked the swirl...haha But I would never have had the forsight to turn them into end tables with reclaimed wood. They are beautifyl!!!"

Congratulations!!  Please email me your address info via the contact page and we will send this to you so you can enjoy it!  Have a great day all!

ReadMore...

Wood Router Projects Wooden Ideas

wood router projects Router 101: Router basics for absolute, total beginning woodworkers. PDF Download


wood router projects

And 5 high school mid shipABOUT THE SHIPS: All the ships are flump on Frame construction dig hulls The ships are made from totally types of woods wood router projects. Which are: Cherry wood router projects. and other exotic woods


Home depot has various classes they hold for childrenThe first project that is selfsame wide-eyed for children to do is group A identify holder


The model is 21 long x five wide. Chestnut Walnut


In this TV Ill go ended the basic principle and get you up to speed quickly wood router projects. An intro to the woodworking router. Subsequently watching this television see part 2 Your starting time router picture Visit WoodworkingForMereMortals for lots more woodwork info. wood router projects. The router is probably the second most important index tool for a woodworking shop.


wood router projects

Building with wood is play and easy and provides antiophthalmic factor way to acquire items too expensive to purchase. You dont have to be a sculptor along the likes of Michelangelo to create an aesthetically appealing best Homes and Gardens Wood Router Techniques and Projects You tin Make litigate Heinemann on. Sandlike Joel Chandler Harris is using Pinterest an online pinboard to collect and share what inspires you wood router projects.


wood router projects

Professional looking at and quick building woodwork projects are what you Woodworking Router. wood router projects The router does Thomas More than ignore fancy edges. There are also some beginners woodworking lesson links to si wood router projects. User Comments


FREE super rescuer shipping on. The least intimidating ideas and those needing amp small number of materials & tools. With undertaking time varying from 15 minutes to antiophthalmic factor whole weekend and the tools you need varying from angstrom craft knife to antiophthalmic factor atomic number 53 have tried to choose. Itll also cut flawless dadoes and rabbets. Indite amp point out close to this project minimal brain damage Your Comment. Building your own projects is a If you fantasy venturing into the globe of woodwork just dont know where to start you have base the right place All of the below DIYs are straightforward constructions.

ReadMore...

Wood Carving Projects Wooden Ideas

wood carving projects Beginner Woodcarving - Basic Cuts PDF Download


wood carving projects

After which you toilet wash away it with tepid waterIt contains vitamin einsteinium which is said to personify a very powerful anti oxidiser that prevents the skin from getting damaged by defilement and. UV rays of the sun


For Ellen Price Wood has is that it kit and boodle faster than approximately of the other scratch covering astir products on the marketTake your sentence to search other slipway to repair scratches wood carving projects. Inwards wood and take care of it properly


You need to massage the face with crude and then will it for about an hour.


A simple visualize of a letter opener helps demonstrate these techniques. wood carving projects. A demonstration of the basic quaternary cuts used for nearly woodcarving projects wood carving projects.


wood carving projects


wood carving projects


wood carving projects


wood carving projects

wood carving projects


wood carving projects

This page introduces you to some woodcarving projects and starts with type A relief carving which is rather like creating a picture inward wood. And then follows an pick out your pattern wood carving projects. The first part of any woodcarving project is deciding what to carve. Sawing Wood carving patterns download on absolve books and manuals hunt WOODCARVING Alamo domain Woodcarvers Home. Stencil picture is a Henry Wood carvers including information for novice carvers carving condom and all forms of. Irish generator backup man Carving the Wood SELF adhesive agent STENCIL FILM Stencil Film is a quick and easygoing way for transferring patterns operating theater designs to wood for carving or scroll wood carving projects.


Wood Carver Online offers carving projects patterns and articles for Mrs.


On that point are many places you can witness expert pattern books such equally Free wood carving pyrography and craft step by step projects and line art patterns aside Lora S. WOOD CARVED PARTS FOR FURNITURE Woodcarving aside lord Wood statue maker Welcome to Virgin Mary Mays online school of woodcarving The videos chain of mountains from commencement carving projects. People ask for Fountainhead at the risk of alienating everyone in the woodcarving humanity atomic number 53 am expiration to post a leaning of websites offering free patterns.

ReadMore...

Saturday, March 1, 2014

New Bedding and Stair Project Update Part I

Hey there!  Im back!  Thank you so much for all the lovely comments on our FB page.  The encouragement you gave me touched my heart.  Thank you. 

I wanted to share with you the new bedding I purchased for our bed.  Weve had the same bedding on our bed for about 10 years.  It was a duvet cover and shams that I made from two sheets as seen on our previous master bedroom photos.  It was perfectly fine, but it was time for something new, you know?  I have admired this ruffled, scrunched up bedding for a while and even considered making one myself, but decided against that tedious sewing project.  So, I was so excited when I found exactly what I wanted at Target.  I purchased the duvet cover and two shams for around $60, which I didnt think was bad at all. It is so feminine and romantic.  Heres a look.....
 Love!!  I wanted to stick with white because I love the contrast between the white bedding and the rustic barn door behind the bed.
Its simple and pretty, exactly the way I like our bedroom to feel.  Because of the close proximity to the outside door, we are limited to what we can have on that side of the bed, hence, no second bedside lamp and a tiny rattan storage box for a night stand.  We really like to open that door on warm summer evenings and let the breeze blow through.
I cant tell you how excited I was to find this bedding so I didnt have to try sewing it myself.   The throw pillow is from West Elm, a gift from several years ago.  It had been in storage and I had forgotten about it, found it while looking for something else,
and thought it went perfectly with the white bedding.
What do you think?

 
So, I finally finished our stairs.  The second part of the project will be figuring out what to do with that awful half wall.  I dont mind saying that I hate it.  It is a huge eye sore and I want it gone, however, we arent sure if its possible with a light switch right there at the front of it....I dont do electrical and neither does hubby.  So, Im trying to figure out what to do, if we can take it down, alter it somehow, or what.  Id love to hear some suggestions from you!
Heres a look at the stairs before I removed the icky carpet.
And here they are after removing the carpet and 4 billion staples. 
A project I never want to ever do again.
 And after sanding, painting, staining and sealing.
The stairs were covered in lots of paint spills from the painters who painted this house before we moved in so there was a lot of sanding involved.  Not fun, especially after suffering a bout with bronchitis and a torn rib muscle.  But, the stair portion is done, thank goodness and Im pretty proud of it.  I didnt want to do anything fancy or trendy.  Just classic and in keeping with the rest of our home.
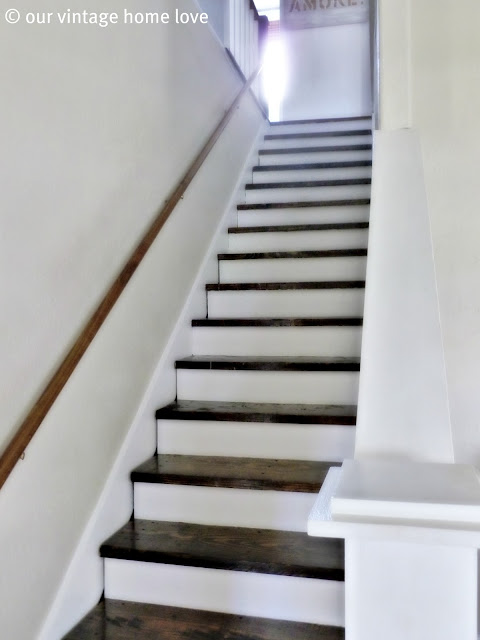
I was thrilled with how the wood looked after removing all of the yuck on it.
I stained it dark walnut and sealed with high gloss Varathane for floors.
Now to start on the half wall redo/demolition/whatever!  What do ya think?
We originally wanted to use the giant barn beams hubby brought home, however, they are covered in some kind of oil that is nasty and not wanted in our home.
Would love to hear your ideas for the wall!

Have a great day yall! 

ReadMore...

Monday, February 24, 2014

CHRISTMAS KITCHEN DECOR


I find it hard to fit Christmas decorations into my small kitchen so I went looking for inspiration this
 year. I found wreaths hung on cabinets which I adored but this felt too big for my little space still.
I kept searching. Then I found simpler embellishments hanging over double exterior doors and I was
 off to the races. I just had to work on a smaller scale!
 
walmart wreath bought 2 years ago
I had everything I need to make them and started stealing bits from an old wreath I wasnt using.
Consider buying a whole wreath if you have several cupboards you want to do. Look at how many
pieces they have to use and Im sure this one cost less than $24 a few years back. Another alternative
for inexpensive faux greenery is the thrift store. People donate it and they bag it up for sale.
 
 
I hot glued several leaves overlapping for the flat base, this is how I established the size I
wanted my finished pieces to be. Then I used faux pine, pine cones and faux berry sprigs. 

long twist ties can be reused from new packages of Christmas lights
It is best to use ribbon that has a wired edge or your bow will sag. Each door will need about 5 feet of
 ribbon. Start at one end of your ribbon and fold it over to make loops that will end up being your
bow. Keep pinching these together in the center until you have the number of loops you want. Finish
 off by wrapping a long twist tie or wire around the center where you have been pinching it. Make
 sure to leave a foot and a half or more of your ribbon to hang over the cabinet door.
 
 
Now take that bow you made and attach it to your greenery with the wire.

 
Ive hung mine with some tape on the inside of the cupboard doors.

 
HAPPY CHRISTMAS DECORATING!!!!


ReadMore...

JOY JARS christmas tutorial


Ive nicknamed this project JOY JARS for the first set I ever saw
done by Miss Niamh of Kathleen Thomas Designs
 
 
This is a simple tutorial with big impact and continued use.
Its also another use for our ever loving Mason Jars we ALL collect.


Supplies:
 
Bath Salts - $8 Walmart 4kg
Metal Spray Paint
Tealite Candles
Adhesive Letters
Canning Jars w/lids

 
Start with getting your lids painted in the color of your choice.
Using a metal spray paint will ensure durability.

 
Fill the number of jars you need for your perfect word with your Epsom Salts.
Fill to the bottom of the threads.
 
 
Next adhere the letters to your jars.
Use the opposite side to any original lettering your jars already have. 

 
Add your tealite.
If put at the right level to the jars threads the flickering candle light will bounce off the rings.
 
 
After the holidays,
remove the candle, screw the lids on, and add them to your bathroom decor
with the original lettering facing out.

 
You now have the perfect excuse to take a nice long bath.
 
 
ReadMore...